Publishing your dictionary
These guides assume you are comfortable with the Command Line, Git, Python and NPM. You must have all of these installed on your machine. You are also strongly encouraged to have a GitHub account. You are encouraged to fork or clone the Mother Tongues Dictionary Starter and follow along.
The simplest way to publish your app is on the web. Publishing to the Android and iOS app stores is an involved process. If you're just starting out, it's highly recommended that you start with the web or mobile (GitHub Pages) deployments first before publishing to Android or iOS.
To get started, you'll need to have prepared and built your dictionary.
note
This process for building apps, and the complexity that comes with it, is just a fact of app-building and would be the same for any other dictionary app you build. Sorry! Don't be mad at Mother Tongues! 😃
Mobile
Because the mobile MTD UI is built with Ionic, the code base stays the same for both Android and iOS builds. Therefore some of the changes only need to be done once.
File Structure
Note, the following is an incomplete look at the file structure of a typical mobile MTD UI. When you clone/fork it, there will be other files/folders. For the purpose of this guide, these are the ones you will need to know about.
Cordova Configuration
Information about your app is kept in the config.xml file at the root of your project. The vast majority of this, you will never need to edit, although you can read more about Cordova configuration here if you're curious.
The parts you will need to edit are at the very beginning of the file:
Bundle ID
First, change the bundle identifiers for all the platforms you wish to build. For Android change android-packageName and for iOS, change ios-CFBundleIdentifer.
important
Pay attention to give your bundle ids appropriate names - you cannot change them once you've published the app. I suggest keeping the identifiers the same for both Android and iOS if possible.
Version
For iOS, you can set the version by changing version, but for Android, you change it by changing android-versionCode.
note
The version attribute accepts decimal values, but the android-versionCode requires 5 digit integers.
Name
Change your app's name by editing the text inside the name element highlighted above.
note
You may have trouble uploading your app if you use certain non-ASCII characters. Frustratingly, the full list of accepted characters does not seem to be published.
Author
You can change your email, website and name as the author by editing the author element highlighted above.
Resources
Ionic will generate all of the different sizes you need for your App's icon and splash screen, but you need to first provide it with templates.
Your source image for icons should be at least 1024x1024 and your splash screen artwork should be 2732x2732. For more information please see Ionic's documentation.
Once you've moved your icon.png and splash.png files to your
~/mothertongues-UI/resources directory, you can generate all of the necessary icon and splash image sizes:
ionic cordova resources
GitHub Pages
There is a built version of the app in mothertongues-ui/www - just replace the mothertongues-ui/www/assets/js/config.js and mothertongues-ui/www/assets/js/dict_cached.js files with your exported data, commit and push the changes, and then turn on GitHub Pages and your app will be published online.
Android (Google Play)
Preliminary steps
Google Play Developer Account
Before publishing your app to the Google Play store, you'll need to register for a Google Play Developer account. At current time of writing, this involves a one-time $25USD fee. The following steps can be done once you've made your account.
Install Android Studio
You must have Android Studio installed, and also ensure your installation includes keytool. You must also have the Android SDK installed that matches your config.xml:
Testing
I recommend also installing Genymotion to run and test your app.
Building
- Create a signing key
You must have keytool. Then, run:
important
You can change my-release-key.keystore to any name. But it is very important to keep this file in a safe spot. If you lose it, or forget the password, you will not be able to update your app!!
- Add the platform:
Make sure you're in your dictionary's directory (usually ~/mothertongues-UI) and then:
After adding the platform, the cordova plugins that we use automatically register some permissions. Unfortunately, the Media plugin also registers the RECORD_AUDIO and READ_PHONE_STATE permissions, which we don't need for MotherTongues and which give an unnecessary warning to the installer.
So, to fix this, go to ~/mothertongues-UI/platforms/android/android.json and remove the highlighted lines below:
Then, go to ~/mothertongues-UI/platforms/android/app/src/main/AndroidManifest.xml and remove the following highlighted lines:
- Build your android app:
Your app will then be built at
~/mothertongues-UI/platforms/android/app/build/outputs/apk/release/app-release-unsigned.apk.
- Then, sign your app,
- Then, zip-align your app,
Then, create a new app and upload your
~/mothertongues-UI/platforms/android/app/build/outputs/apk/release/release.apk
file.
Re-building
You must first 'bump' the version in config.xml and follow steps 3, 4, 5 using the keystore you already created.
Uploading to Google Play
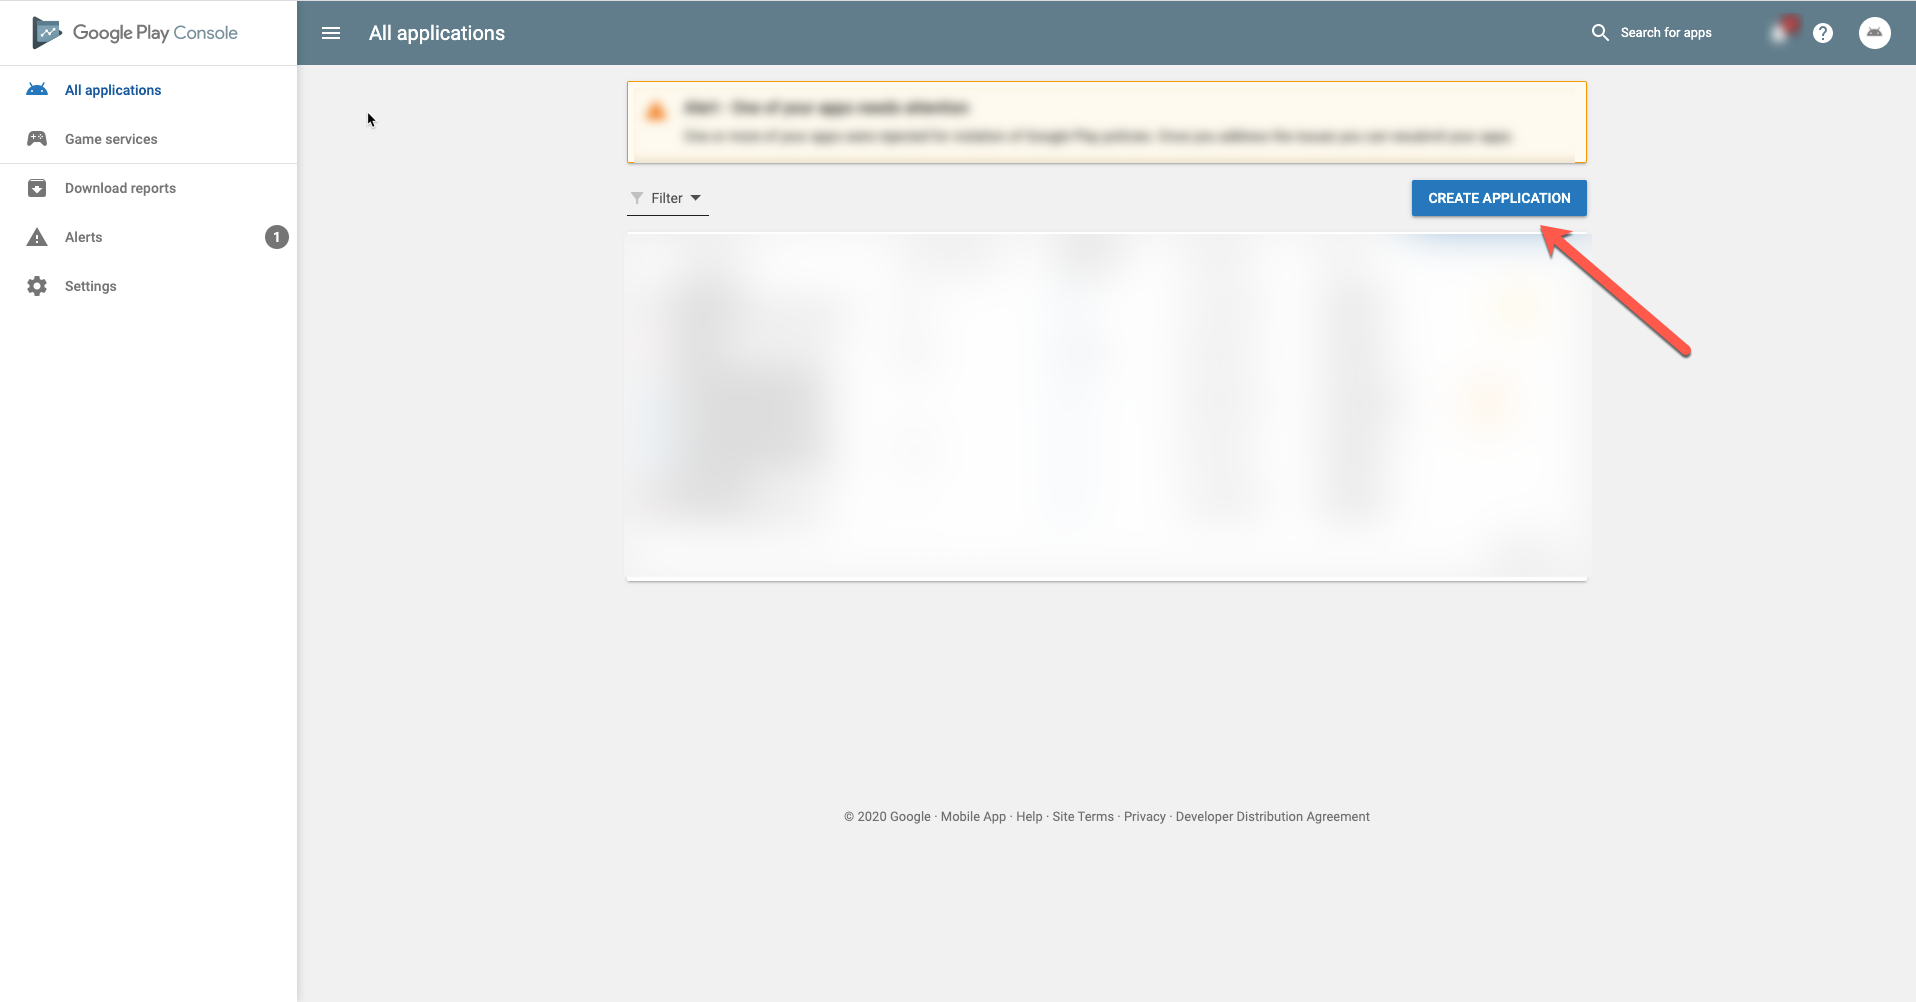
First, log in to your Google Play account. Then, create an new application:
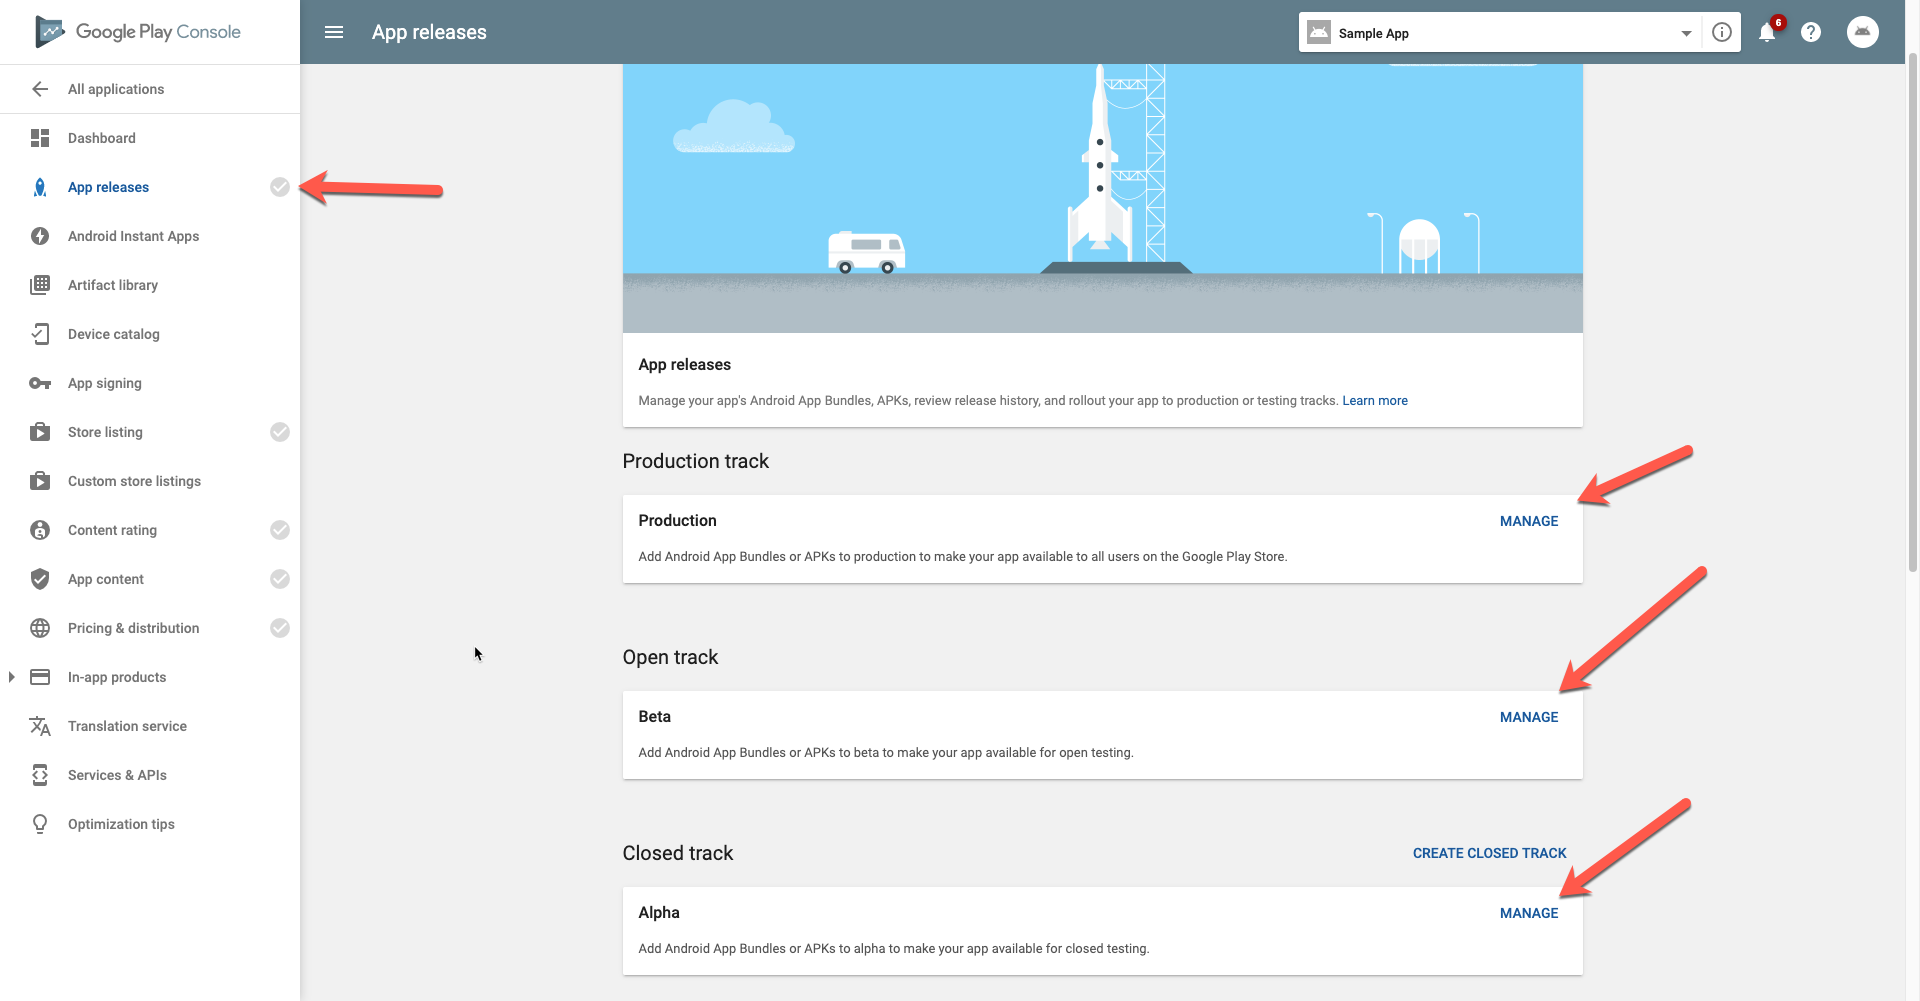
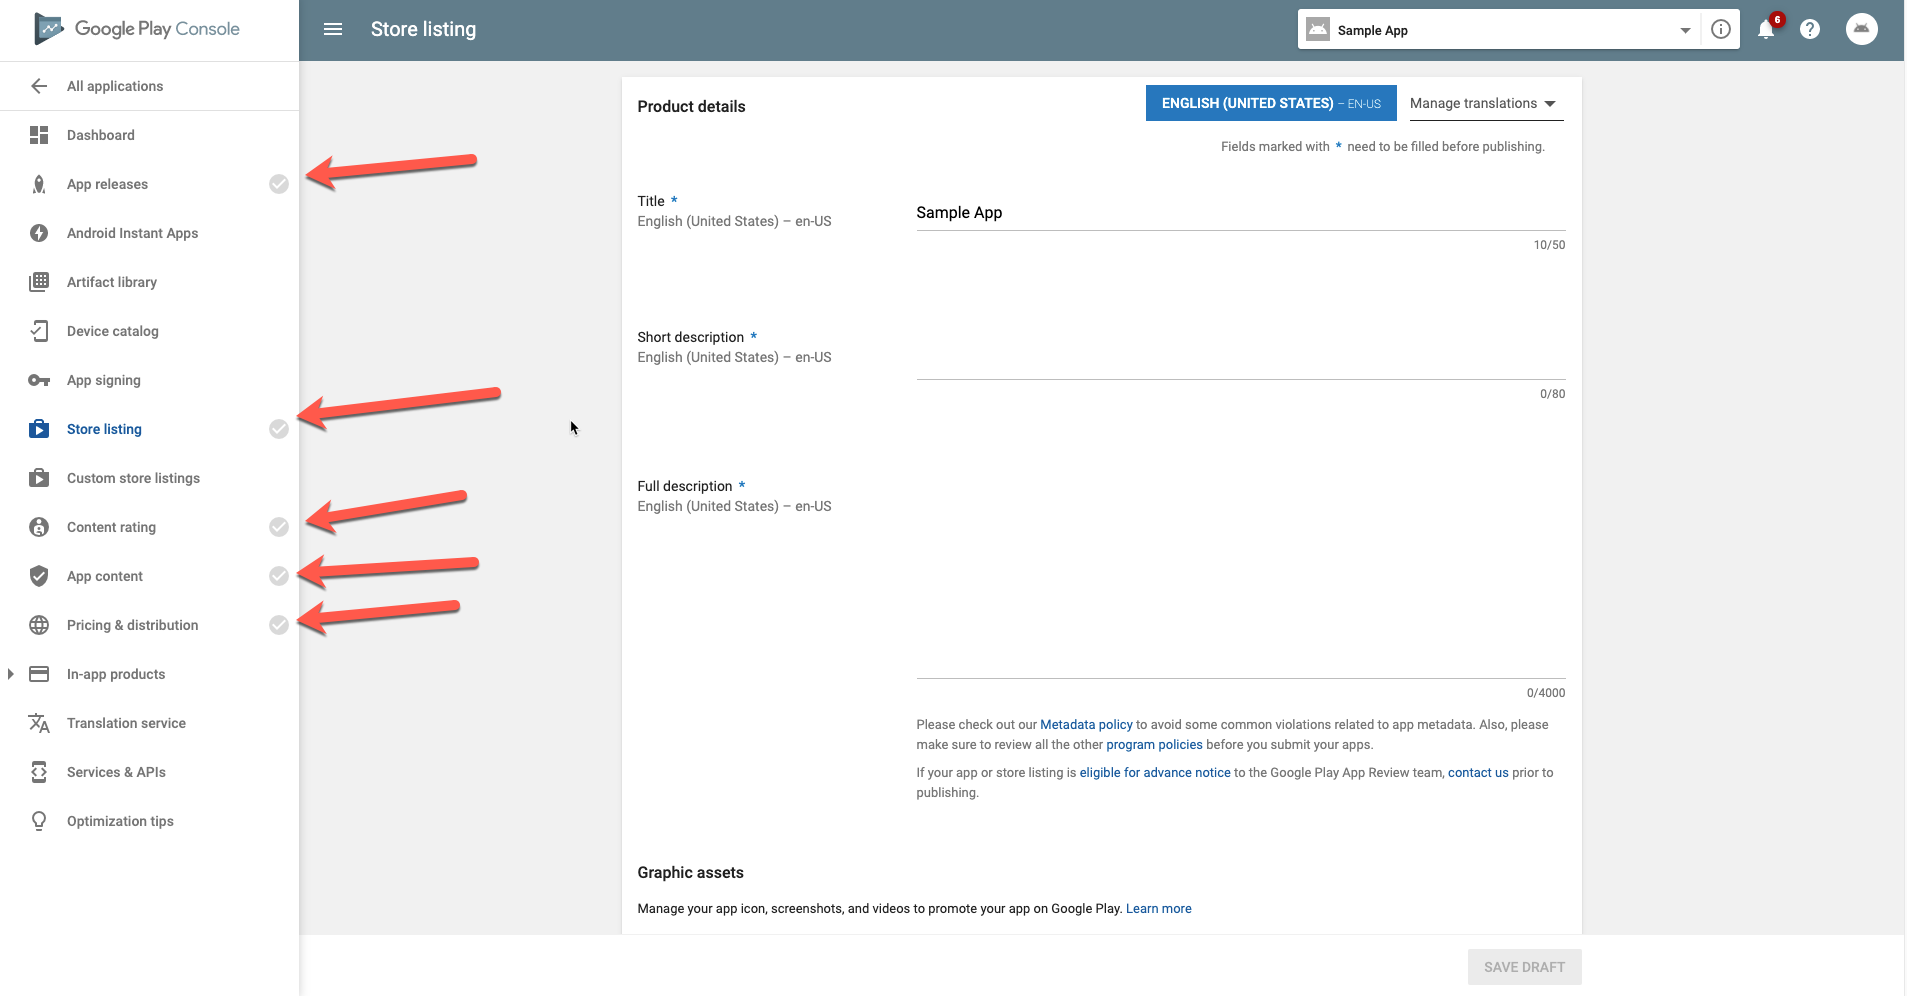
There, you will have to fill out information such as the title, description and contact information for your app. You will also have to complete a 'content rating', categorize your app, add screenshots, and choose the countries to allow distribution for.
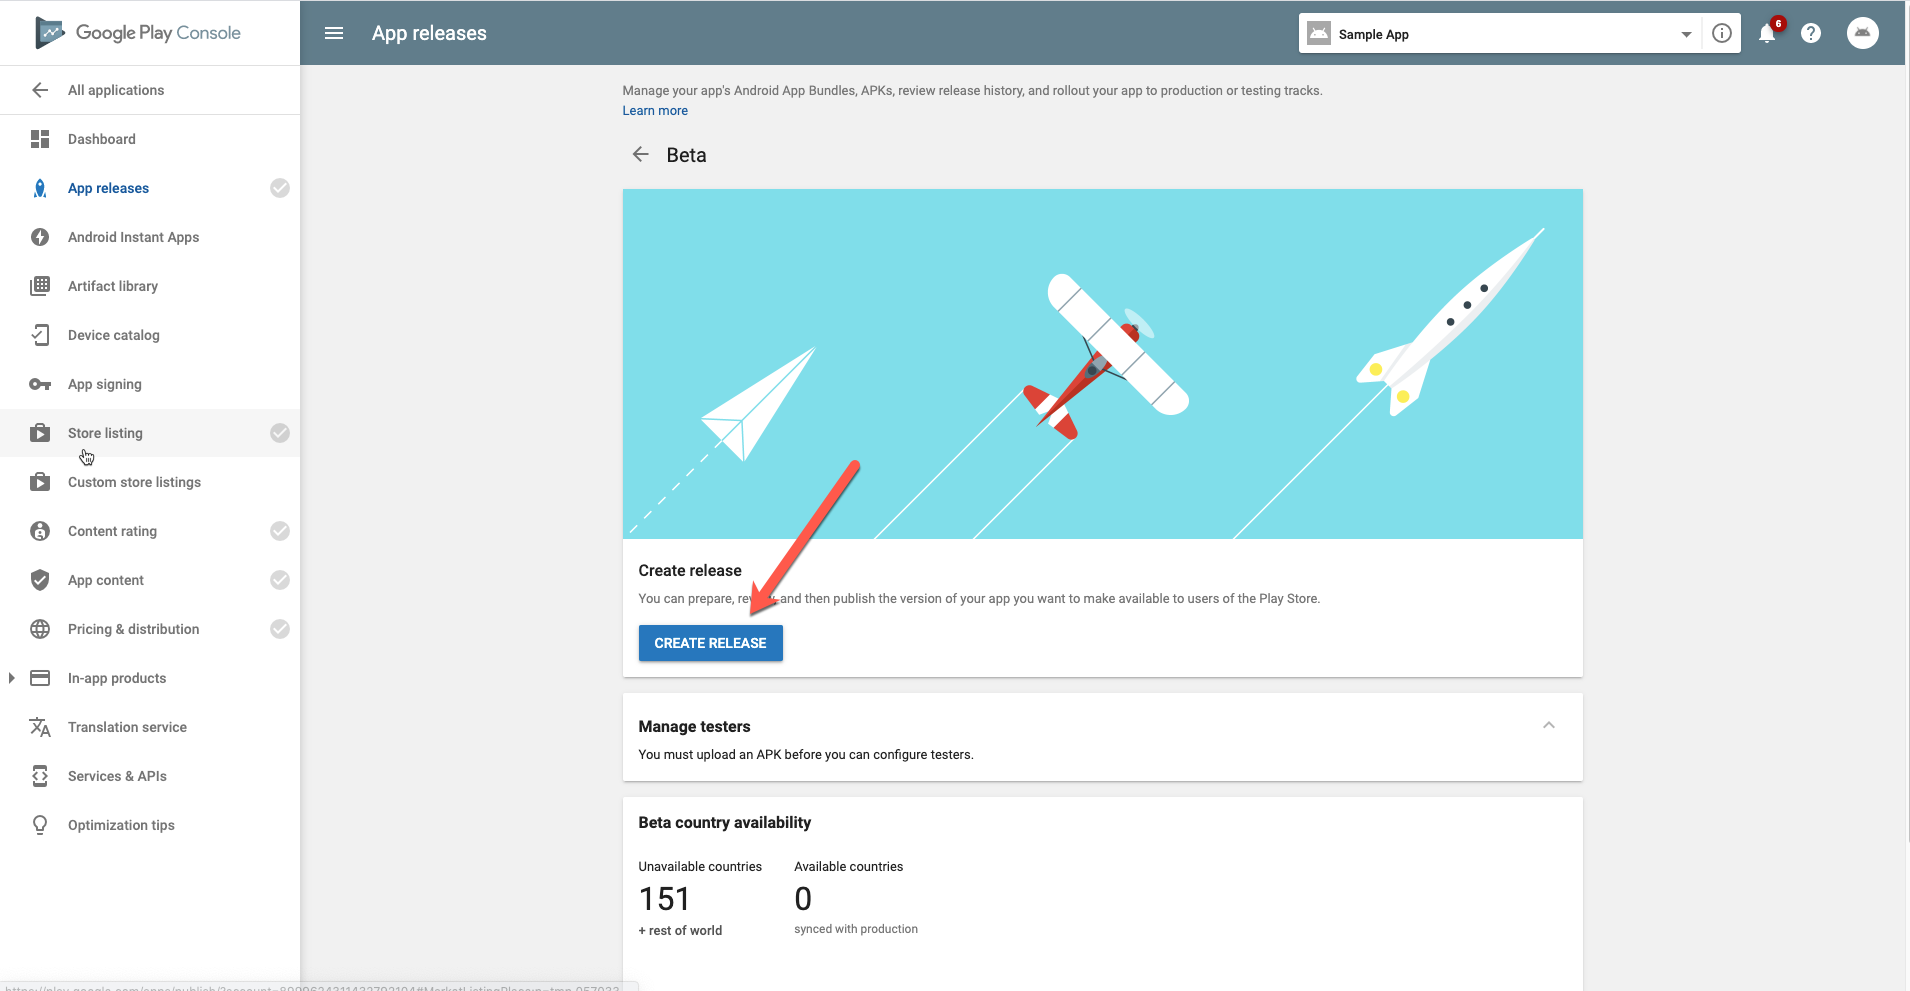
You will also have to create a new release (the screenshot shows a Beta release for example):
And:
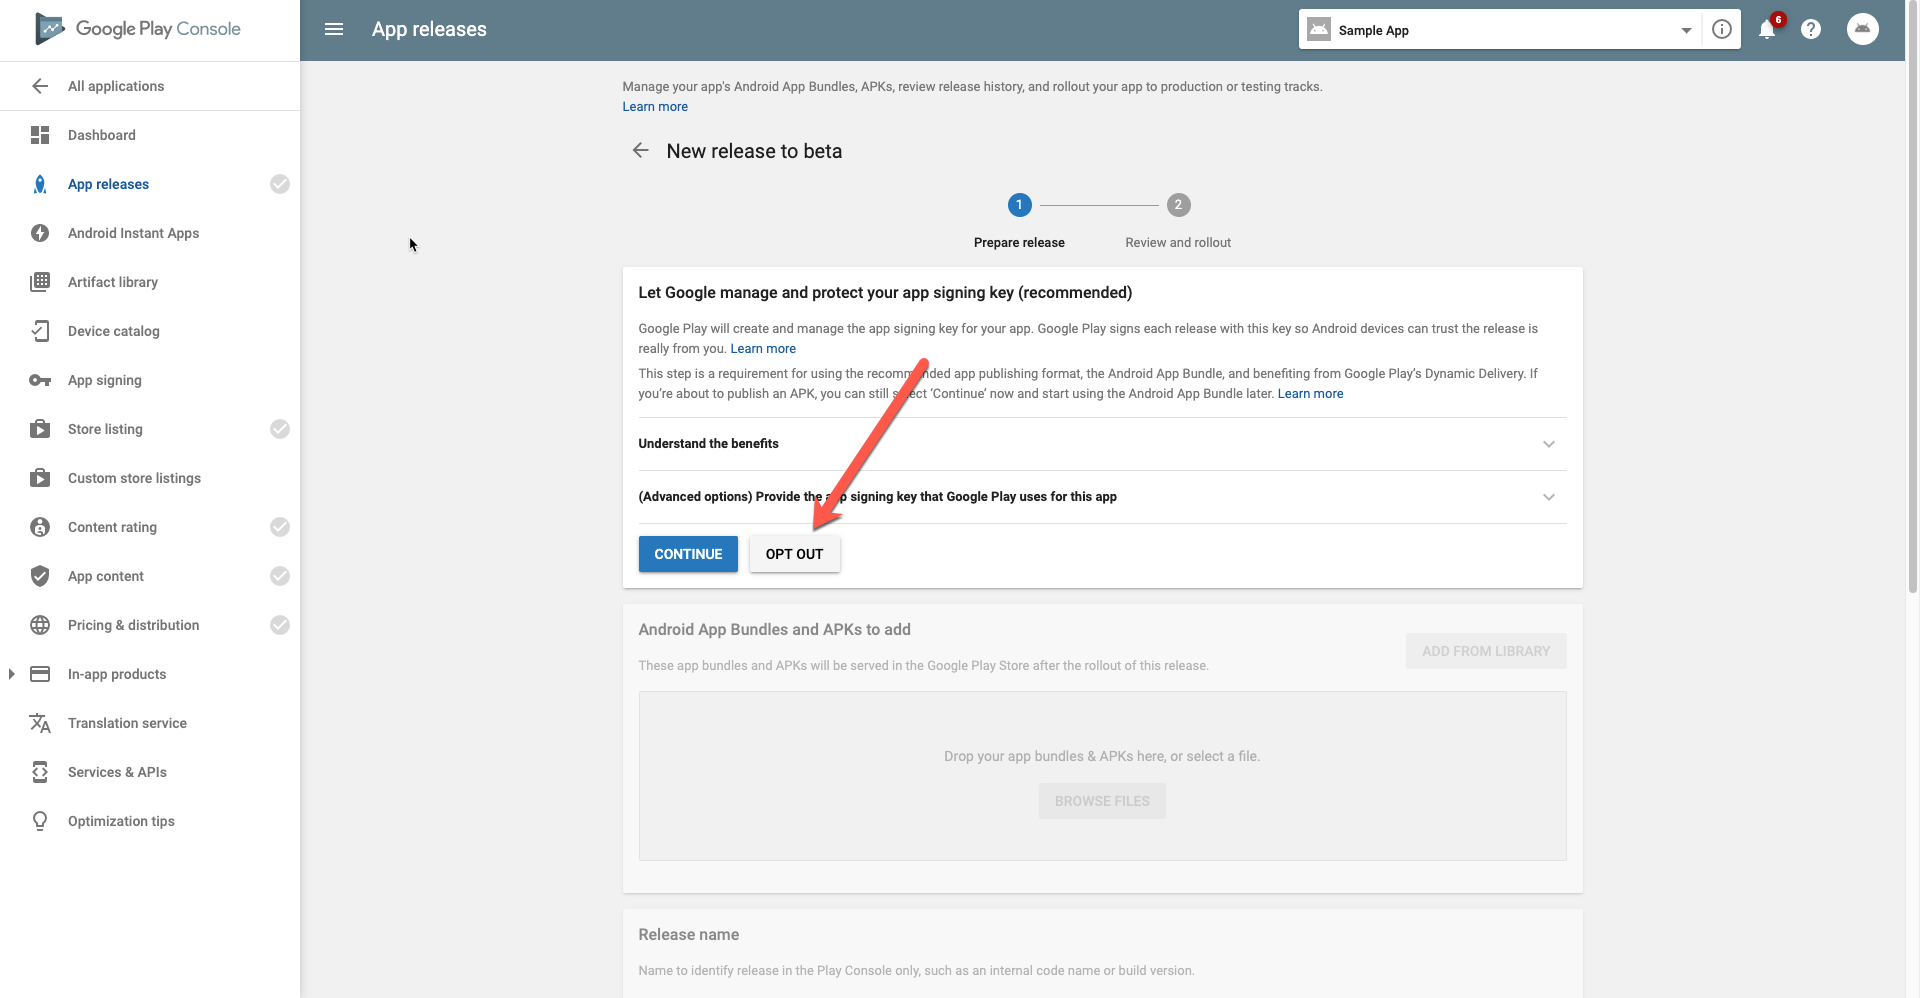
Opt out of Google managing your signing:
And drag/drop your apk:
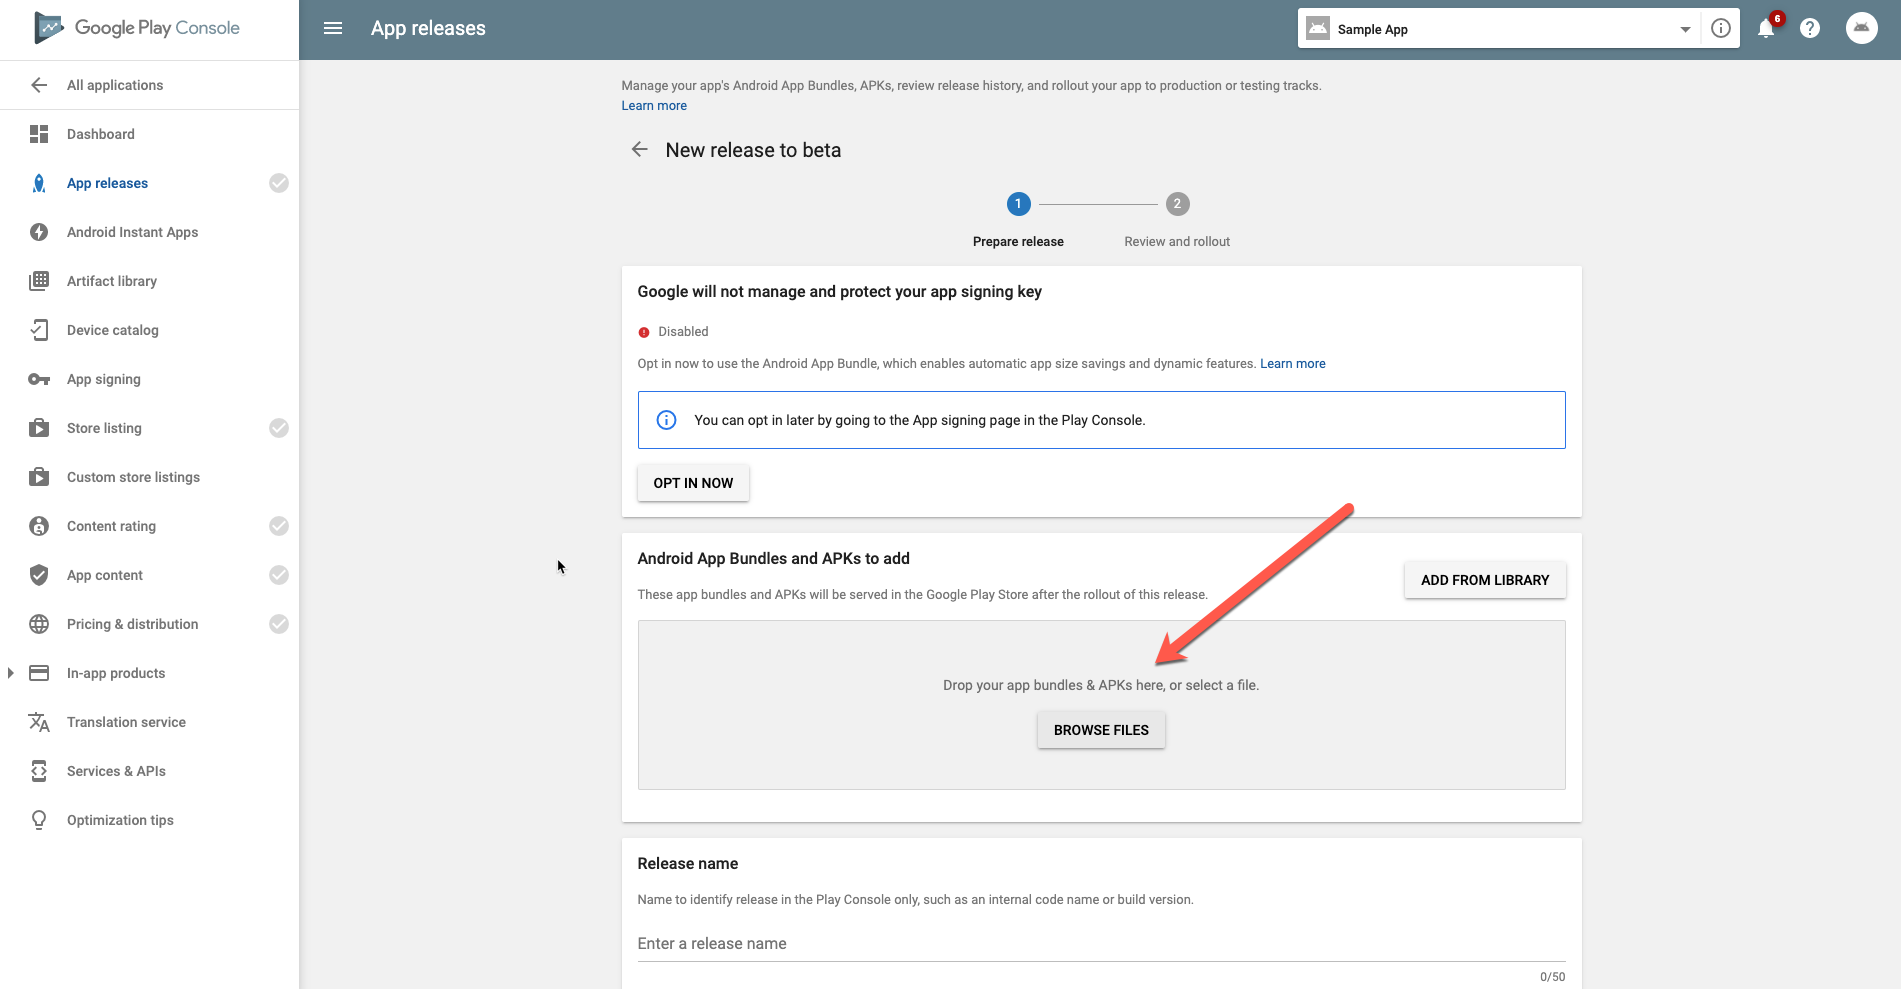
Then, you can upload the ~/mothertongues-UI/platforms/android/app/build/outputs/apk/release/release.apk file
If you've successfully checked off all of the boxes, you can review and 'roll out' your release to production to publish on the Google Play Store after testing it out. The screenshot below shows boxes that have not been checked:
iOS
Preliminary steps
You must have a Mac do the following build steps on a Mac. Unfortunately, there's no way around this. Both Travis and GitHub Actions let you spin up Mac hardware, so if you don't own a Mac, you might look to adapt these steps to one of those.
Apple Developer license
You must have an Apple Developer License in order to upload an app to the Apple App Store. At time of writing, this is a yearly $99USD fee.
Xcode
Your mac must have Xcode installed. At time of writing, you must also have MacOS 10.15.0 (Catalina) or higher, Xcode 11, and iOS SDK 13 as apps targetting previous SDKs have been disallowed since March 2019.
note
Apple's $99USD/yr fee, constantly changing requirements, and utter lack of support make publishing on iOS a total pain. It's a shame, but they're usually a necessary evil - just remember to take deep breaths as you deal with bugs 🙃
Building with Xcode
- Add ios platform
Make sure you're in your dictionary's directory (usually ~/mothertongues-UI) and then:
ionic cordova platform add ios
- Build your iOS app:
ionic cordova build ios --release
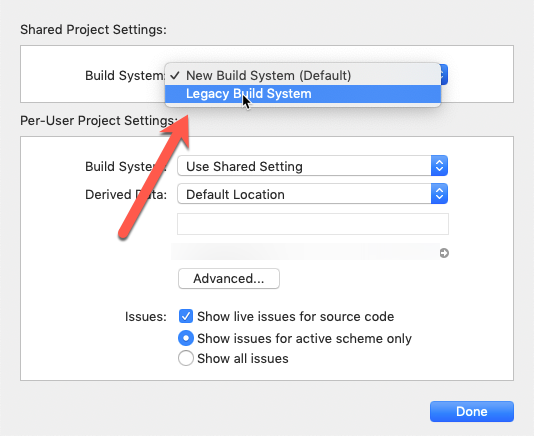
Open the newly created xcodeproj file at
~/mothertongues-UI/platforms/ios/<YOUR_APP_NAME>.xcodeprojChange to 'legacy build'
File > Project Settings
- Change plist by adding 'App Uses Non-Exempt Encryption' to NO
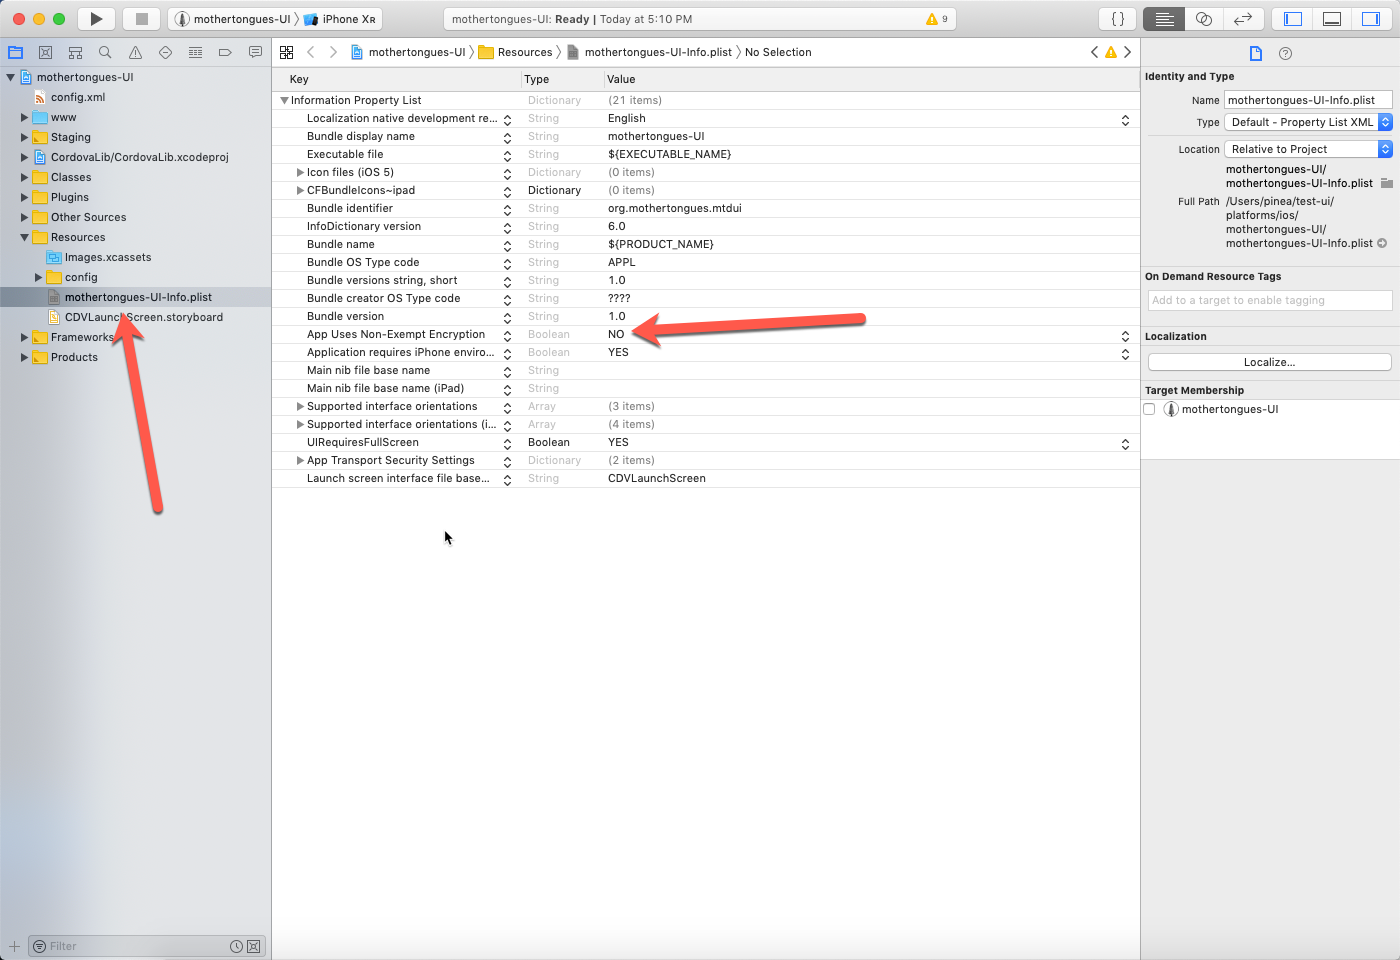
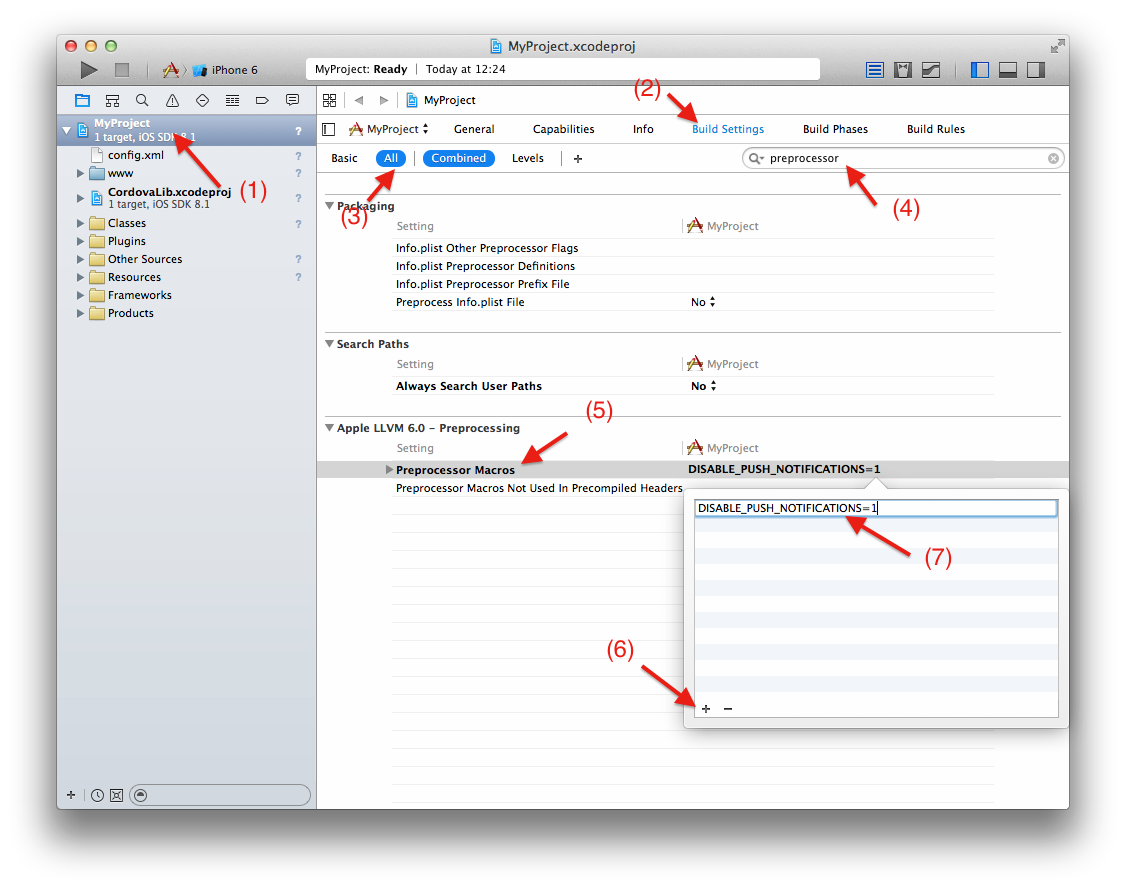
*photo cred: Steven de Salas
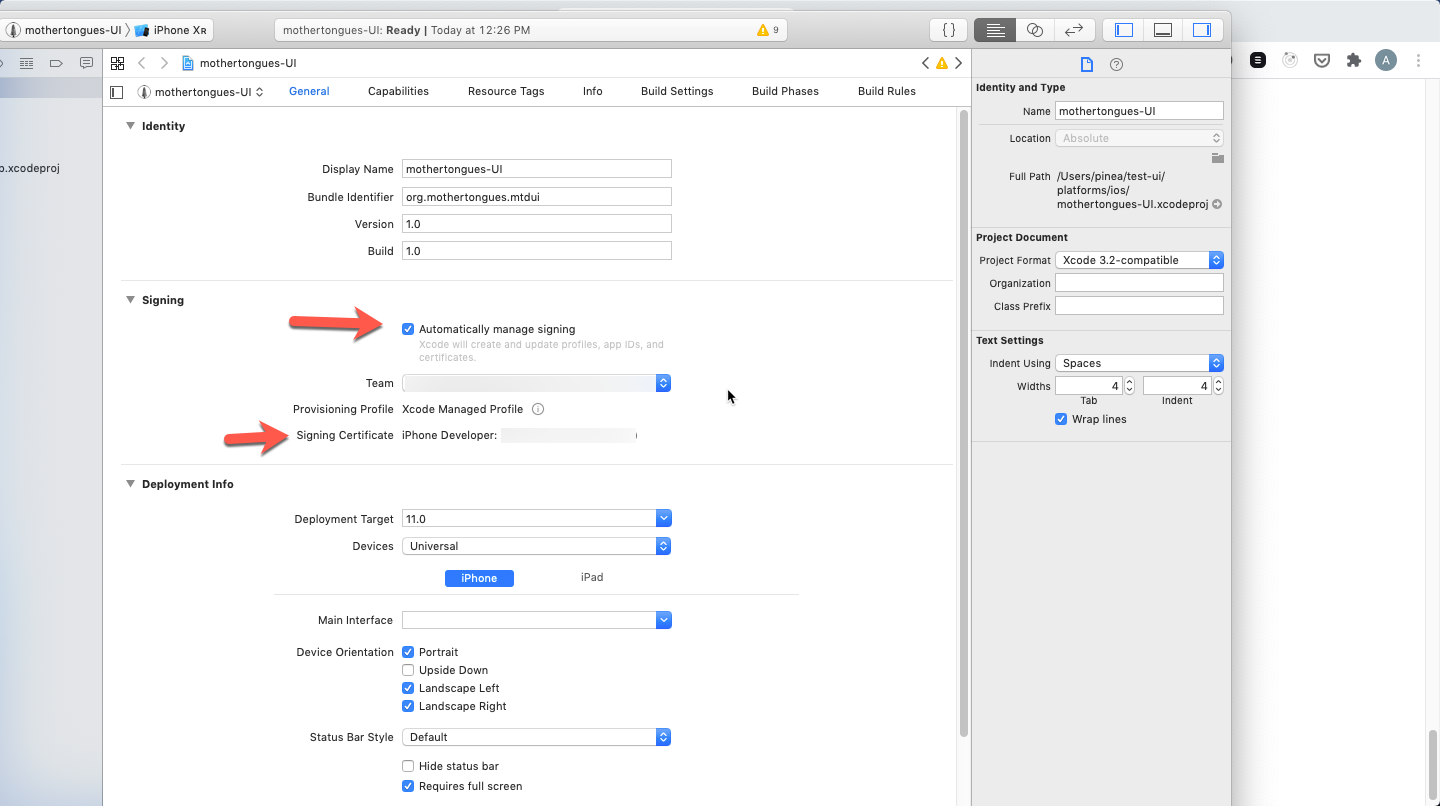
- Add your Apple Developer account
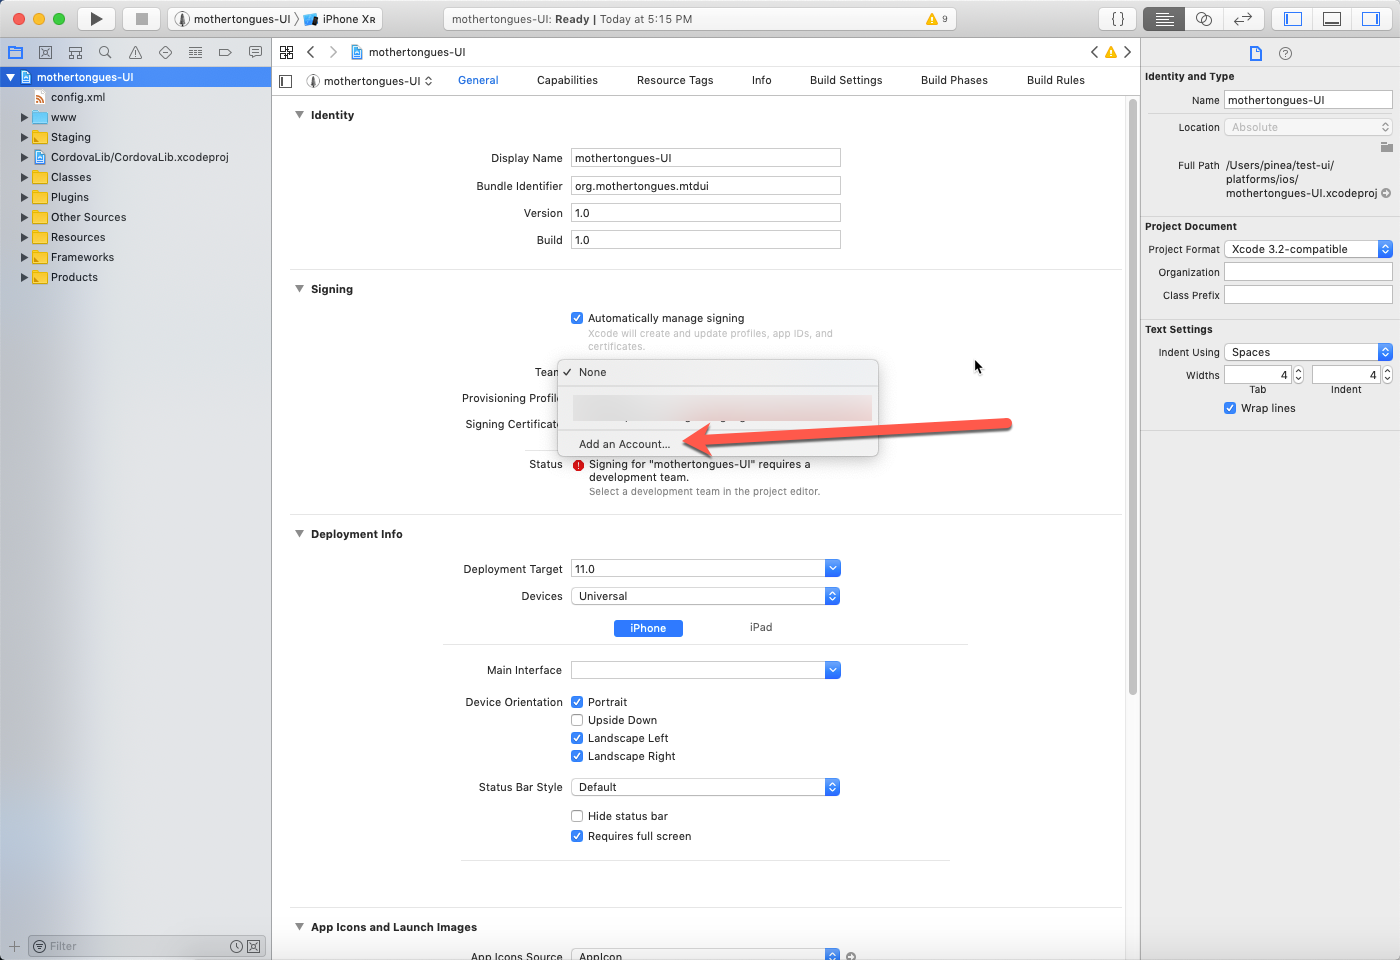
- Creating credentials
Frankly, code signing on iOS is a huge hassle. First, create an App ID, then you must create a 'distribution provisioning profile' in order to provision your app for being downloaded on the App Store. Then, you need to select 'automatic code signing' in Xcode:
- Making your app Store page
There are lots of guides on how to do this online. But it's essentially the same as the Android process. You'll need to fill out some meta data and upload screenshots etc.
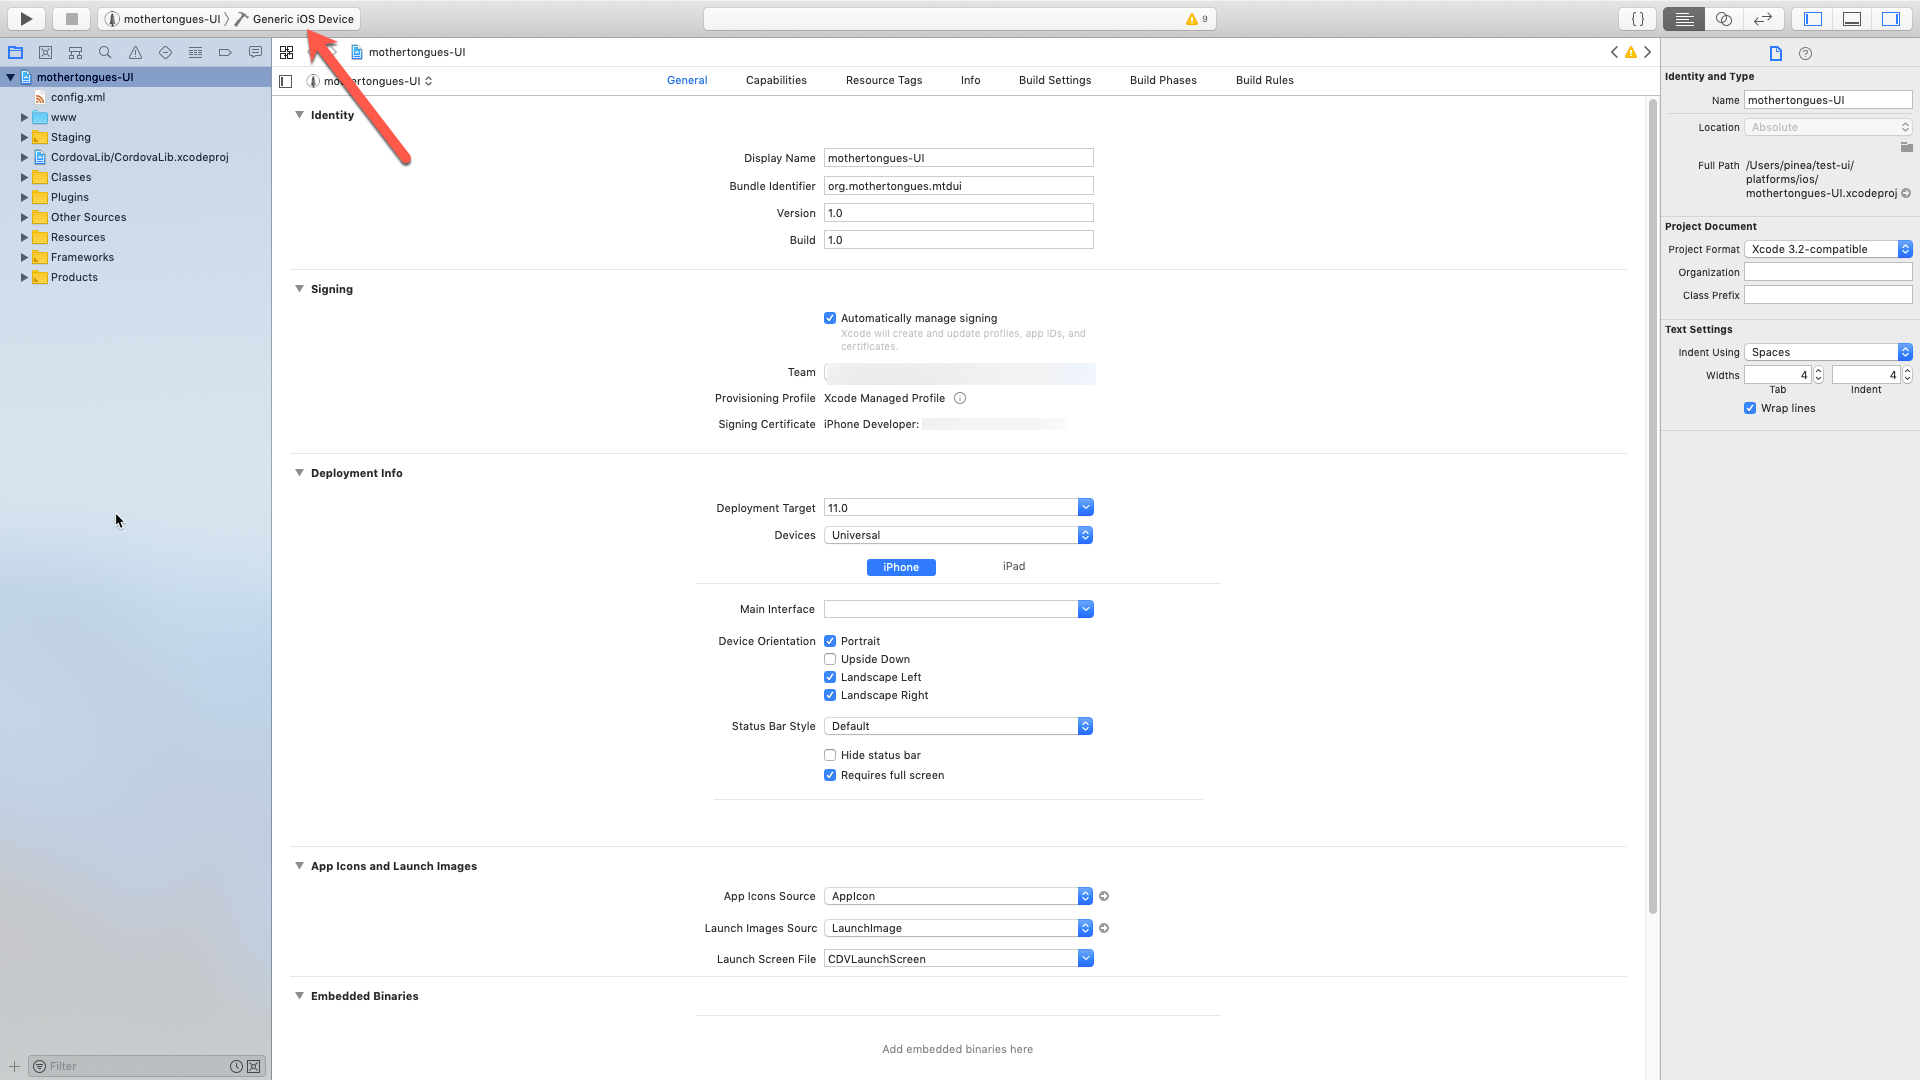
- Select a Generic iOS Device build target
- Archive the build
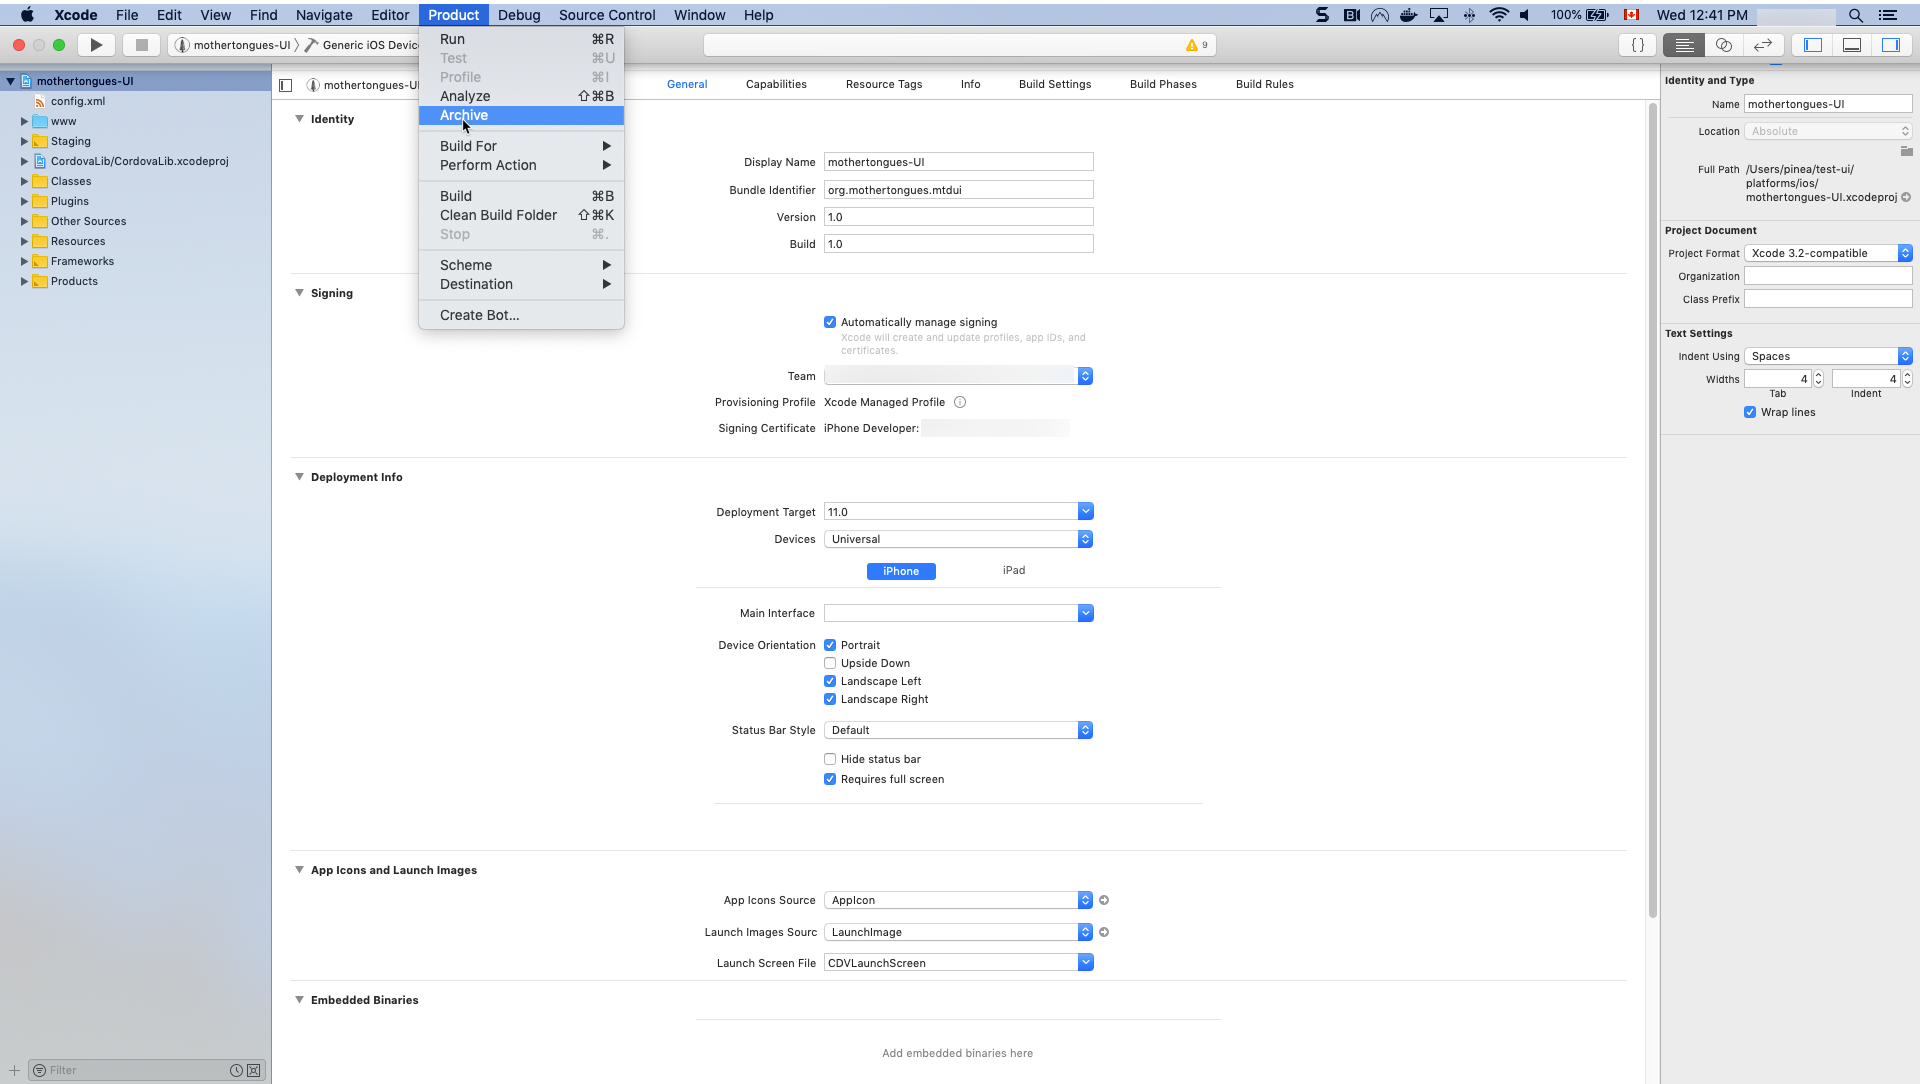
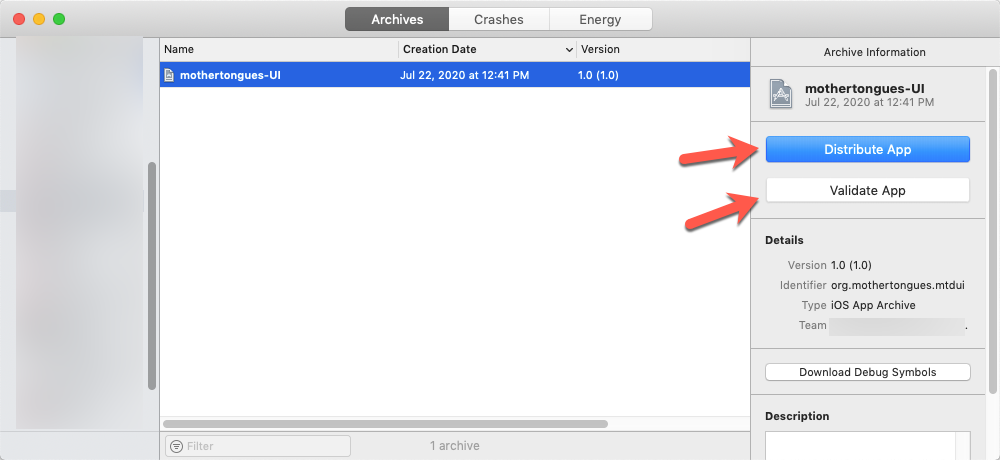
- Then, Validate and Distribute your app
You'll need to select 'iOS Store' when distributing, and then 'upload'. This will upload your app to iTunes Connect where you can then test it out on TestFlight or submit it for review to be released.
Rebuilding
To re-build (after updating data for example), you must do steps 2, 3, 10, 11 and 12 from the build process.
fastlane
As you can see, building can be time consuming, particularly if you have many steps. It's also difficult to keep up with the hardware requirements imposed by Apple. So, you can set up fastlane to automate some of the steps.
There are many ways to use fastlane, this small guide will show you how to set up automatic uploads to TestFlight using GitHub actions.
iOS
Install TestFlight
Initialize Fastlane
- Select
2. 👩✈️ Automate beta distribution to TestFlight.
Fastlane will add a Gemfile, Gemfile.lock and fastlane folder to your project.
important
You should have already created your provisioning profile and other credentials. See step 7-9 of 'Building with Xcode
- Automate code-signing
Replace the step in your fastlane/Fastfile with the following:
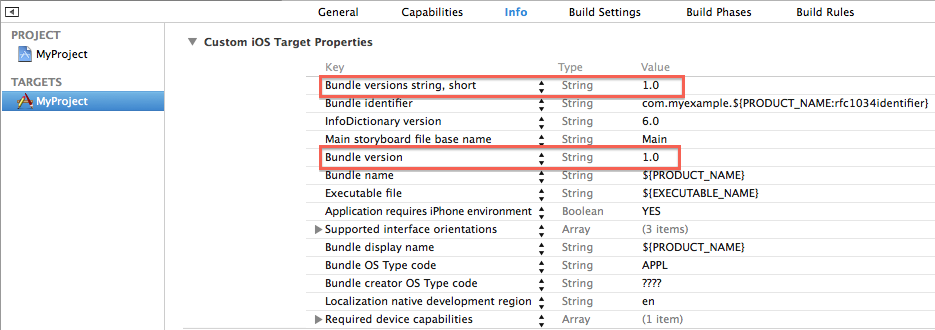
First, change your version and set the versioning system to 'Apple Generic'
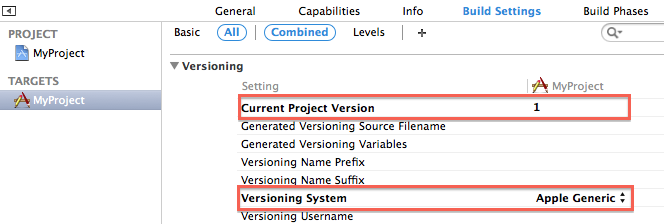
Change the build numbers
- Set up an automatic code signing routine using match
Match lets you save all of your Apple credentials in a single place (using either git, google_cloud or s3). I recommend using git.
To do that, from your ~/mothertongues-UI/platforms/ios folder, run fastlane match init and select git. Then, give it the address of a private repo you control.
Then, run fastlane match appstore to generate the provisioning profile for your app.
- Finally, set it all up with GitHub Actions
Set up a new GitHub action with the following:
As you can see, there is a whole host of GitHub secrets that have to be created. To break these down:
- MATCH_PASSWORD
You must provide the password from your match encryption here.
- MATCH_KEYCHAIN_NAME
This is the name of the keychain to be created, I recommend using something basic and memorable
- MATCH_KEYCHAIN_PASSWORD
You must have a password for the for the keychain
- GH_PAT
You must create a GitHub personal access token and save it as a secrets
- FASTLANE_SESSION
You must create a fastlane session. You can do that by running the following with your iTunes Connect email:
Save the resulting session as a secret.
tip
These sessions expire, so you will have to renew them. If you are managing multiple apps, you might consider creating a GitHub Organization so that you can share all of these secrets across your builds.
- FASTLANE_APPLE_APPLICATION_SPECIFIC_PASSWORD
You must also provide an application specific password by first visiting https://appleid.apple.com/account/manage, and generating a new password.
If you set up your repo with all of these secrets and this action, you can push your code updates, and automatically upload to TestFlight!
Web
Building your web version is much less involved than building an app, so if this is all you need, count yourself lucky!
GitHub Pages
If you've forked and cloned the official MotherTongues UI Web repository, then all you need to to is prepare and build your dictionary and then commit and push the changes:
Custom hosting
To host on your own server:
Change the app name and i18nPrefix in ~/mothertongues-UI-Web/projects/mtd/src/environments/environment.prod.ts to your Dictionary name and the directory your dictionary will be hosted at.
So, for https://example.com/dictionaries/mydictionary you would put:
Then, if your dictionary is being served anywhere other than at the root of your website (ie, if you put anything other than / in the i18nPrefix above) then change the ~/mothertongues--UI-Web/package.json accordingly: